Table of Contents
((include pointer to quickstart guide))
((introduction))
- Unpacking the unit
((includes a unit interface tour, be sure to mark off which light is which))
- QuickStart Guide
- Posing for pictures
- Setting backgrounds
- Setting the lighting
- Activating special effects
- Adding new poses and images
- Setting access controls
((be careful moving the unit, it's not completely linked as that would break some of the scripts, so you will have to move ____ parts after you move the main unit, is there a way to move them all together anyway?))
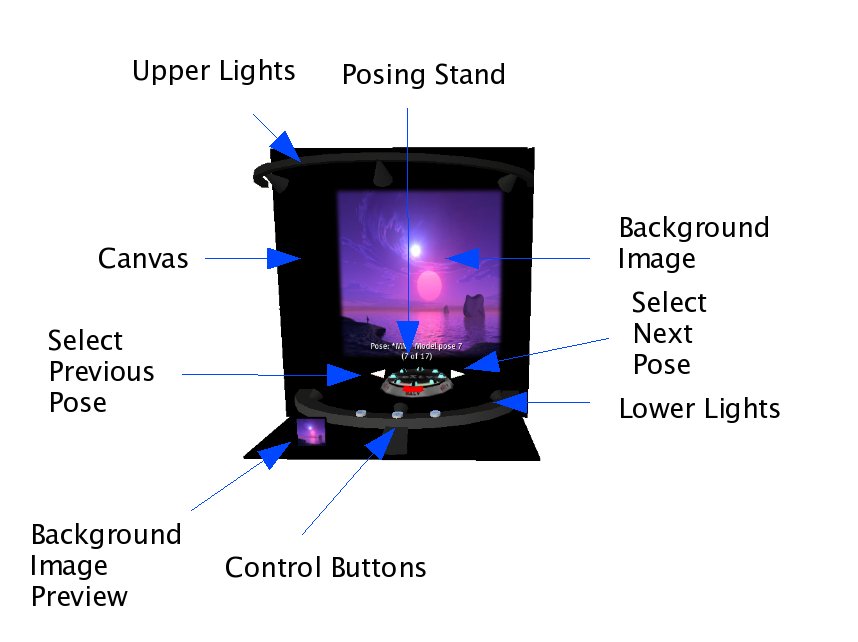
Figure 1: The Glam Studio unit with important areas marked.
For those who want to get working as quickly as possible and bother with figuring out all of the features later, we offer this quick start guide. To utilize Glam Studio's built-in poses and backgrounds to take photos, do the following:
- Click the Background Settings button shown in Figure 2 to open the Background Settings menu, which is shown in Figure 3.
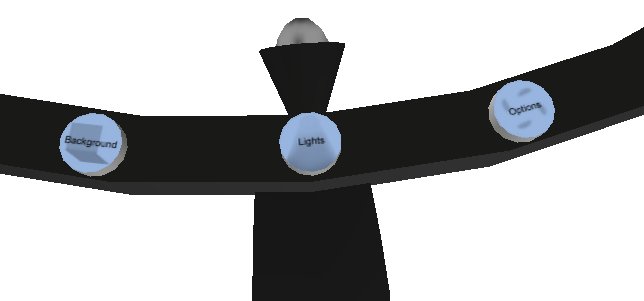
Figure 2: The Glam Studio control buttons, situated along the unit's lower frame as shown in Figure 1.

Figure 3: The Background Settings menu.
- If you want to change the Canvas color, click CanvasClr and then in the subsequent menu, select the color you want to use. When you have the Canvas as you want it, select MainMenu to return to the previous menu or Ignore to close the menu.
- If you want to change the Image, first enter the Background menu if necessary by clicking the Background button, and then click ChooseImg to open the Image menu. Here, click the image you want to use, click <<< or >>> to move one step back or forward through the options, or click <<<<< or >>>>> to move to the beginning or end of the options. Once you have the image you want, if you want to Tile it over the background instead of having a single copy of the image, click Tile/Fix--click it again to reverse this setting. When you have the Image as you want it, select MainMenu to return to the previous menu or Ignore to close the menu.
- Right click the Pose Stand Base and select Pose from the pie menu.
- Click Next Pose or Previous Pose to move through the available poses.
- Snap your picture(s)! If you don't know how to do this, see _______.
There are many more options for configurable settings. You can tilt the posing stand, adjust the lighting, and more. See the full manual for details.
To pose an avatar for pictures using Glam Studio, do the following:
- Right-click the Posing Stand as shown in Figure 1.
- In the pie menu, select Pose. Your avatar will attach to the posing stand, taking the post that is currently active.

Figure 4: The Posing Stand and its functions.
- If you want to turn your avatar you have a few options:
- To start the stand rotating continuously clockwise, click the green curve as shown in Figure 4.
- To start the stand rotating continuously counter-clockwise, click the pink curve as shown in Figure 4.
- To stop the rotation and return the stand to its forward position, click the red bar as shown in Figure 4.
- To turn the stand to a particular point and hold it there, click the blue and black Turn Avatar ball (as shown in Figure 4) that you want the avatar to face.
- If you want to change the pose your avatar is using, click the green Next Pose arrow (as shown in Figure 4) to advance through the available poses, or click the pink Previous Pose arrow (as shown in Figure 4) to back up through the poses.
- If you want to tilt the stand, click the blue Options button (as shown in Figure 2). In the Options menu (shown in Figure 5), click 45Stand. This action will tilt the stand forward by 45 degrees. To return the stand to its normal alignment, click the Options button again and select AlignRset--this option returns the stand to level and facing forward.
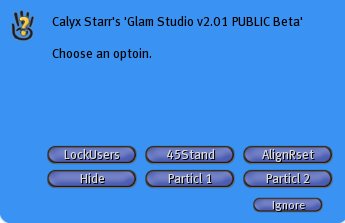
Figure 5:The Options Menu.
There are two portions of the unit that you can change to alter the background for your photos: the Canvas and the Background Image as shown earlier in Figure 1. You can think of the Background Image as the "photo" inside the "frame" of the Canvas.
To change the Background Image among the available options, do the following:
- Click the Background Settings button as shown earlier in Figure 2. The Background Settings menu shown earlier in Figure 3 appears.
- Click the ChooseImg button to open the Choose Image menu shown in Figure 6.

Figure 6:The Choose Image menu.
- Make your menu choice. As you will see, there are many options to choose from. Some offer colors, some are navigational, and others change how the images are displayed. In general:
- Color or picture name: If it's a color name, then it's a color you can set the Background Image to. You may see the name of an image, which means it's a picture you can set the Background Image to.
- <<<<<: A series of five left arrows returns you to the beginning of the Choose Image menu.
- >>>>>: A series of five right arrows jumps you to the end of the Choose Image menu.
- Tile/Fix: Toggles between having a bunch of small copies of the image (Tile) and one single copy (Fix).
- <<<: A series of three left arrows backs up one page in the Choose Image menu.
- >>>: A series of three right arrows moves forward one page in the Choose Image menu.
- MainMenu: Returns you to the Background Image main menu.
- When your menu choice has been made, the Background Image changes to match it if you chose an image, and the menu re-opens. Make another choice if desired. Otherwise, click MainMenu to return to the Background Images menu or click Ignore to close the menu completely.
Once you have the Background Image set, you may want to change the Canvas as well to alter the border around the Background Image. To do this:
- Click the Background Settings button as shown earlier in Figure 2. The Background Settings menu shown earlier in Figure 3 appears.
- Click the ChooseImg button to open the Choose Image menu shown earlier in Figure 6.
- Click the CanvasClr button to open the Canvas Color menu shown in Figure 7.

Figure 7:The Canvas Color menu.
- Make your menu choice, where color names will change the canvas color, selecting Main Menu will return you to the Background Settings menu, and clicking Ignore will close the menu. Once the color changes, the menu re-opens.
- If you want to change your selection, do so. Otherwise, choose either Main Menu to return to the Background Settings menu and make another selection, or click Ignore.
Finally, there are a number of other settings you might take advantage of in order to set up the background the way you want it:
- You can choose to get rid of, or add, the hood along the top of the unit. To change whether the hood is visible or not, click the Background Settings button as shown earlier in Figure 2 and then click ToglHood.
- You can resize the entire unit if you need to. To do so, click the Background Settings button as shown earlier in Figure 2, click ChgSize to open the Size menu as shown in Figure 8, and then click Small, Medium, or Large. After you make your selection, the menu will reappear, so feel free to easily try each size to find the best for your purposes.
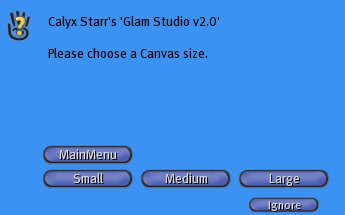
Figure 8:The Size menu.
- You can hide the posing stand if you need a full shot of your model. To do so, type /9 hide. To make the posing stand visible again, type /9 show.
- You can even hide the entire unit if you want, making it invisible. It's probably a good idea to attach the avatar to the posing stand first (if you have the unit invisible and need to find it, press the key combination Ctrl-Alt-T to highlight it in red, the same key combination gets rid of the highlighting). Then, click the Options button to open the Options menu shown earlier in Figure 5. Click Hide to make the unit invisible, or if the unit is already hidden, click Hide again to bring it back.
Glam Studio offers a range of lighting control options. For the simplest, you can choose whether you want the background colors to be muted or bright by choosing the Background Settings button as shown earlier in Figure 2, then clicking FullBrite. Most of your lighting options, however, are available by clicking the Lights button (again, as shown earlier in Figure 2) to open the Lighting menu (Figure 9).

Figure 9:The Lighting menu.
Note: To set your lighting back to its defaults at any time, open the Lighting menu and click the ResetLite button. The menu will not re-open after this action.
There are six lights available in the Glam Studio. To control them, open the Lighting menu and click SetLight. Doing so opens the Set Lights menu (Figure 10).
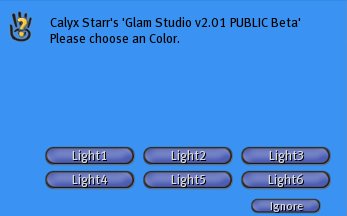
Figure 10:The Set Lights menu.
Click the light you want to control, and the Light Color menu appears (Figure 11).
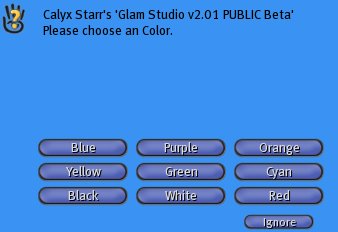
Figure 11:The Light Color menu.
Select the color you want this light to show. Once you have done so, the Intensity menu appears (Figure 12).

Figure 12:The Intensity menu.
Select how intense you want this light to shine. The menu does not re-open once you have made this selection.
If you want to make changes to this light, run through the process again. Or, move on to the next light, changing all six if that's what you want. Then, if you want to save this particular lighting combination, open the Lighting menu and click SavePrest to open the Save Preset menu (Figure 13).
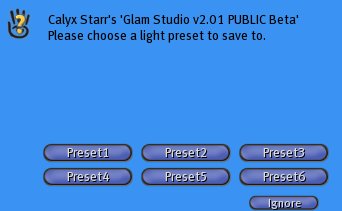
Figure 13:The Save Preset menu.
Select the preset number you want to assign to this combination. The Glam Studio announces in chat that the setting has been assigned, and the menu closes. Later, to return to this setting combination, open the Lighting menu and click LoadPrest. The Load Preset menu looks identical to the Save Preset menu shown in Figure 13. Click the number you assigned to that particular setting combination, and the lighting will change appropriately.
Not only can you configure Glam Studio's lighting, you can also activate particles to really snaz things up. To do so, click the Options button as shown in Figure 2, and then either click Particl 1 or Particl 2. In each case, the Particles menu looks as shown in Figure 14.

Figure 14:The Particles menu.
Click the effect you want to activate. The menu closes and the particles appear. It may take a moment for them to properly resolve, so if you just see little blocks, wait and hover your mouse over them. Later, to stop the particles, return to the Particles menu and select None for Particl 1 and/or Particl 2.
To install new poses in your Glam Studio:
- Right-click the Glam Studio and select Edit from the pie menu. The Second Life Edit menu appears.
- Click the More button to expand the Edit menu.
- Click Edit Linked Parts to add a check in its checkbox.
- Click the middle of the top of the Glam Studio Posing Stand as shown earlier in Figure 1. You are now editing just the posing stand.
- Click the Content tab. You now see a list of all of the poses that are currently in the stand.
- Click the Second Life Inventory button. The Inventory window opens. You may need to rearrange the Edit and Inventory windows so you can fully see both of them.
- Drag the poses you want to add from your Inventory into the Contents portion of your Edit window. If you want to remove a pose or two while you're at it, drag the pose in question from the Glam Studio Posing Stand out into your inventory in order to make a backup, and then in the Contents section of your Edit window, right-click the pose and select Delete.
-
- Click the X in the corner of your Edit window to close it. Click the Inventory button to close your Inventory widow.
To install new background images:
- Stand in front of the unit with the Background Image Preview box (see Figure 1) visible.
- Click the Inventory button to open the Inventory window.
- Open the folder containing the image you want to install.
- Right click the image. A shortcut menu opens.
- Select Rename from the menu.
- Change the image name for something short enough to fit in the list of background images.
- Hold down the CTRL key and select the image.
- Drag the image onto the Background Image Preview box, and let go. The image will now appear in the list of background images.
You probably don't want everyone in the world messing with your Glam Studio unit. For this purpose, it comes with the ability to set access controls. You set who can use the unit by doing the following:
- Click the Options button as shown in Figure 2. The Options menu appears as shown in Figure 5.
- Click the LockUsers button to open the User Settings menu shown in Figure 15.
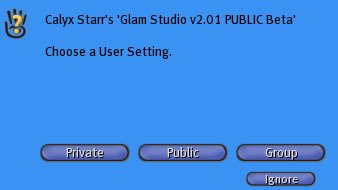
Figure 15:The User Settings menu.
- Choose either:
- Private: Only the owner can use the Glam Studio unit.
- Public: Everyone can use the Glam Studio unit. This setting is temporary, and the unit will revert to private-only use after a period of time.
- Group: Members of the group the unit belongs to can use it.
To change the group your unit is assigned to, right-click it and select Edit from the Second Life pie menu. Click the More button, and then by Group, click the Set button. The Groups menu will appear. Select the group you want the unit to belong to, and then click OK. Click the X in the corner of the Edit menu to close it.